Sunday, 24 July 2016

Blog Design with CSS and HTML

Blog Design with CSS and HTML

In this post I will show you how to design blog template frame with CSS and HTML step by step . CSS helps you to design better and flexible webpage layouts. This is very basic CSS + HTML tutorial, CSS just awesome it adds flavor to the web page.
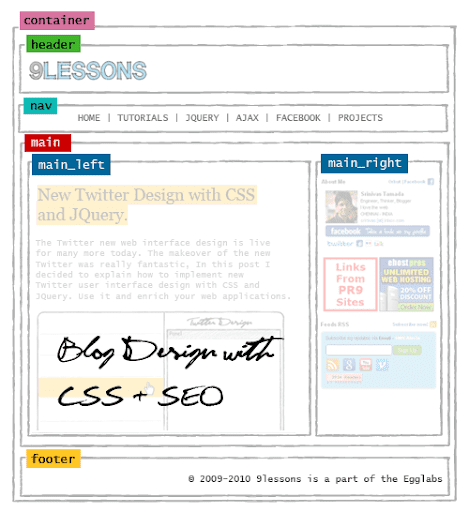
Blog design CSS and SEO

Step 1
Web layout divided into four horizontal parts are Hearder, Nav, Main and Footer. Here Container is the parent div.

HTML Code
<div id="container">

<div id="header">1 Header</div>
<div id="nav">2 Nav</div>
<div id="main">3 Main</div>
<div id="footer">4 Footer</div>

</div>

Blog design CSS and SEO

CSS Code
margin:0 auto; centers a div
#container
{
width:900px;
margin:0 auto;
overflow:auto;
}
#header
{
height:90px;
}
#nav
{
height:30px;
}
#main
{
overflow:auto;
}
#footer
{
height:40px;
}

Step 2
main (content part) div dividing into two vertical parts are main_left(article part) and main_right(sidebar part)
<div id="main">

<div id="main_left">Article</div>

<div id="main_right">Sidebar</div>

</div>

Blog design CSS and SEO

CSS code
#main
{
overflow:auto;
}
#main_left
{
float:left;
width:600px;
}
#main_right
{
float:left;
width:300px;
}

Step 3
Now working with an unorder list <ul> tag.
<div id="nav">

<ul>
<li>HOME</li>
<li>PROJECT</li>
<li>TUTORIALS</li>
<li>FACEBOOK</li>
<li>JQUERY</li>
</ul>

</div>

Blog design CSS and SEO

#nav
{
overflow:auto;
}
#nav ul
{
list-style:none;
height:30px;
padding:0px;
margin:0px;
}
#nav ul li
{
float:left;
margin:10px;
}

Home Page
This page should be with multiple article title links with little description, so that reader can quickly find more information. W3C standards specifying <h1> tag use for top-level heading.
Blog design CSS and SEO

Article Page
Here article title is the most important and top level, so title should be in <h1> tag.
Blog design CSS and SEO

Final Code
Take a look at this demo link
HTML Code
<div id="container">

<div id="header">
Header
</div>

<div id="nav">

<ul>
<li>HOME</li>
<li>PROJECT</li>
<li>TUTORIALS</li>
<li>FACEBOOK</li>
<li>JQUERY</li>
</ul>

</div>

<div id="main">

<div id="main_left">Article</div>
<div id="main_right">Sidebar</div>

</div>

<div id="footer">Footer</div>
</div>

CSS Code
<style type="text/css">
#container
{
width:900px;
margin:0 auto;
overflow:auto;
}
#header
{
height:90px;
}
#nav
{
overflow:auto;
}
#nav ul
{
list-style:none;
height:30px;
padding:0px;
margin:0px;
}
#nav ul li
{
float:left;
margin:10px;
}
#main
{
overflow:auto;
margin-top:3px;
}
#main_left
{
float:left;
width:600px;
min-height:400px;
}
#main_right
{
float:left;
width:300px;
min-height:400px;
}
#footer
{
height:40px;
}
</style>

Floating Facebook Like Box for Blogger

How to Add Facebook Like Box into Blogger Blog

Posted by : Ravikant verma
Facebook fan Page are a great way to promote your blog or website and facebook like box is widely used social plugin from Facebook developers. This facebook like box will help your visitor to become regular reader just by clicking like button. So that this box will increase number of your facebook fans. To get this widget follow below procedure,

 
  • Simple fecebook like box

Let me explain how to add simple facebook like box.#

                            Floating Facebook Like Box for Blogger
1. Login To Blogger Account.
2. Click Layout > Add A Gadget.
3. Select HTML / Javascript > Paste The Following Code In content Box.


<iframe src="//www.facebook.com/plugins/likebox.php?href=http://www.facebook.com/pages/ThingsGuide/281417998619583&width=292&height=258&colorscheme=light&show_faces=true&border_color&stream=false&header=false&" style="border:none; overflow:hidden; width:292px; height:258px;" >

Replace my facebook page URL  with your page URL, Change Width And Height According To Your Template.

4. Now save and you are done.


  • Floating facebook like box for Blogger
Floating Facebook Like Box for Blogger

Now I came up with new tutorial for adding floating like box to blogger.

  • Adding Jquery Plugin
1. Go To Dashboard > Template > Edit HTML
2. Search for </head> teg in your template and just below it paste the following JQuery code (You can ignore this step if Jquery Link is already added in your template)

<script src='https://ajax.googleapis.com/ajax/libs/jquery/1.6.1/jquery.min.js' type='text/javascript'/>

  • Adding Widget Code
1. Go to Layout > Add A Gadget
2. Select HTML/Javascript
3. Paste the following code inside it,
<script type="text/javascript">
 //<!--
 $(document).ready(function() {$(".w2bslikebox").hover(function() {$(this).stop().animate({right: "0"}, "medium");}, function() {$(this).stop().animate({right: "-250"}, "medium");}, 500);});
 //-->

 </script> <style type="text/css"> .w2bslikebox{background: url("https://blogger.googleusercontent.com/img/b/R29vZ2xl/AVvXsEjDmQKs-8PLmkA3ev3E4Lzr1s8WsjFRKvP3hzN_kJpnmPABa4ubuiEJLnNQtLLUXFYRR5R0DU8qczO73nj0QTyRwwQIHu2R3Xn0RA5s-0LLPnaXmrE5MlthaD4mRUnn0ULGbBFtjKDnGlzs/s1600/FloatingFB.png") no-repeat scroll left center transparent !important;display: block;float: right;height: 300px;padding: 0 5px 0 46px;width: 245px;z-index: 99999;position:fixed;right:-250px;top:20%;} .w2bslikebox div{border:none;position:relative;display:block;} .w2bslikebox span{bottom: 12px;font: 8px "lucida grande",tahoma,verdana,arial,sans-serif;position: absolute;right: 6px;text-align: right;z-index: 99999;} .w2bslikebox span a{color: #808080;text-decoration:none;} .w2bslikebox span a:hover{text-decoration:underline;} </style><div class="w2bslikebox" style=""><div>
 <iframe src="http://www.facebook.com/plugins/likebox.php?href=http%3A%2F%2Ffacebook.com%2Fpages/ThingsGuide/281417998619583&amp;width=245&amp;colorscheme=light&amp;show_faces=true&amp; connections=9&amp;stream=false&amp;header=false&amp;height=292" scrolling="no" frameborder="0" scrolling="no" style="border: medium none; overflow: hidden; height: 292px; width: 245px;background:#fff;"></iframe><span><a style="font-family: arial, sans-serif; font-size: 9px; color: #999;" href="http://things-guide.blogspot.com/" target="_blank"> TG</a></span> </div> </div>

4. Replace pages/ThingsGuide/281417998619583 with your Facebook fan page URL.
5. Now save your template and you are all done!

Visit your Blogs to see it floating at the right side of your webpage.

How To : Show Only Titles In Archive Pages and Label Pages in Blogger

How To : Show Only Titles In Archive Pages and Label Pages in Blogger 

by Zaheer Khan..

This is one great hack that'll let you show only blog titles when you see open a link that displays all posts under one label. You can click on Blogging How Tos in the top menu of my blog. It actually points to a link that displays all posts under the label blogging.

This will help the visitor to have a glance of what different posts are there in that category . Lets see how to do that in step by step.

Step 1. Go to Templates -->Edit HTML


Step 2. Click on Proceed


Step 3. Then click on the  Expand Widget Templates check box. Make sure its checked. Find the following code....


?
1
<b:include data='post' name='post'/>

Step 4. Replace the above code with the following....


<b:if cond='data:blog.homepageUrl!= data:blog.url'>
             <b:if cond='data:blog.pageType != "item"'>
              <h3 class='post-title'><a expr:href='data:post.url'><data:post.title/></a></h3>
                <b:else/>
                   <b:include data='post' name='post'/>
                </b:if>
            <b:else/>
           <b:include data='post' name='post'/>
           </b:if>

Done! Now click on any label and you'll be seeing only titles of your blogs.

Top 10 Facebook tips

Top 10 Facebook tips

Below is a listing of our top 10 tips for the popular social networking website Facebook.

Hide users, games, polls, etc.

It quickly gets annoying seeing some users posts, game invites, polls, etc. Hovering your mouse to the right of the post and clicking the Hide button as shown below can hide any post. After pressing the button you'll have the option to hide that user or in the case of a Facebook application the option to hide that application from ever showing up on your profile.
Hide Facebook users, games, polls, etc.
To unhide someone or unblock an application click the Edit Options link in the bottom right corner of the news feed as shown below.
Facebook unhide friends
Greasemonkey and FB Purity
Although Facebook does not give you the option to hide friends, friend requests, or various notifications, these can be hidden using browser add-ons. If you're running Mozilla Firefox, Chrome, Opera, or Safari we suggest installing the Facebook Purity add-on.

Update your privacy settings

Click Account in the top right corner of the Facebook window and then click Privacy settings to adjust who is capable of seeing what on your Facebook profile. We highly recommend going through all the privacy settings to verify your privacy is properly protected.
Anything that is not set to friends only or friends of friends can be seen by anyone searching on the Internet. Below is a few things we recommend for most users.
  1. Under Search in Privacy settings uncheck Public Search Results. Adjusting the settings prevents users from finding your account and profile picture in search results such as Google
  2. Under Application settings, make sure you're only allowing applications you want to have access to your information. Applications that you grant rights to can have access to your Facebook profile information.

Use the Facebook top bar for navigation

Facebook navigation
Knowing how to properly navigate is vital if you want to get the most out of Facebook. Below is a brief description of each of the available options in the top bar as shown above.
Home (facebook logo) - Clicking this logo takes you to your wall (News Feed) that shows all friends recent posts.
Friend requests - If any friend requests are waiting to be approved this icon shows a notification of how many friends are waiting for approval. This icon can also be clicked when you want to view any friend recommendations or search for friends on Facebook.
Messages - This section allows you to send and receive private messages between one or more of your friends.
Notifications - Any time a friend or Facebook application creates a new post you'll be notified in this section. Clicking this icon shows all recent notifications. To change notifications including any Facebook applications or games click the See All Notifications link at the bottom and check or uncheck what you want to be notified on.
Search - Finally, the search box in Facebook can be a powerful tool that can be used to quickly find any current friends or people on Facebook. Also, searching for terms such as a company name, product, sports team, music band, etc. will find fan pages and groups that can be joined.

Modify your account notifications

Keep your e-mail and your cell phone clean by updating or eliminate Facebook notifications or keep more up-to-date by adding new notifications. Facebook notifications can be added and removed by clicking Account link in the top right corner, then Account Settings, and then clicking the Notifications tab.

Top News and Most Recent

Facebook News and most Recent
By default Facebook displays your wall postings in the News format, which means it only displays posts it believes are most relevant to you. These results are based on your past interaction with your friends. If you want to see every post made by all your friends that are not hidden click the Most recent link in the upper right section of your news feed as shown in the above picture example.
If you want to adjust who shows up manually click the Edit Options in the bottom right corner of your news feed.
Facebook unhide friends

View High School work friends

If you've added your High School or previous Work locations to your profile, quickly see all classmates and co-workers on Facebook by clicking the link in your Info tab under your profile.

Quickly change profile picture

Your profile picture can be changed by visiting your profile, hovering the mouse over your current profile picture, and clicking the Change Picture link in the top right corner.

Don't post private information on friend's walls on in comments

When you make a post on a friend's wall or in any of their comments realize that any of their friends are going to be able to see that post. If you want for something to remain only between you and a friend send them a Facebook message instead.

Suggestions and random friend invites

As you get more friends on Facebook it will begin making friend, groups, and fan suggestions. These are suggestions made by Facebook and not your friends. Unless these are something you're interested in they can be ignored.
This same rule can be applied to people who may want to be your friend that you don't know. If you don't know someone don't accept his or her friend invite. Once someone becomes your friend they'll have access to any information your friends are capable of seeing.

Tag your Facebook friends in your photos

Always make sure to tag any of your Facebook friends that are in pictures you upload. However, never tag someone who is not in the picture. When someone is tagged in a photo that picture is automatically added to that persons profile and is a great way to share pictures with all friends.

Top 10 Windows 8 tips and tricks


Top 10 Windows 8 tips and tricks

Update to Windows 8.1

Microsoft has released Windows 8.1, which is a free upgrade for anyone running Windows 8. This update addresses many of the problems users have had with Windows 8 and also adds a Start button. Visit Microsoft's Windows 8.1 page for the update.

Customize your tiles

Windows 8 tilesMake the most of your Windows Start screen tiles by adjusting the sizes, where they are located, and what is listed.
  • Move any tile by clicking and dragging the tile. While moving a tile, if you need a larger view of the Start screen move the tile towards the top or bottom of the screen to zoom out.
  • Use your mouse wheel to scroll left-to-right through your tiles.
  • Any Desktop shortcut or program can be pinned to the Start screen by right-clicking the icon and choosing Pin to Start.
  • In the bottom right-hand corner of the start screen is a magnifying glass with tiles, click this icon to get a zoomed out view of your Start screen. In this view, if you right-click on a group of tiles you'll be given the option to name group, which can be useful if you have a group of related tiles (e.g. games). In this view, you can also click and drag a group to organize your tile groups.
  • Create a new speed bump between tile groups by moving a tile to a speed bump.
  • Resize any User tile or Live tile by right-clicking the tile and choosing resize.
  • If there is a tile you want on your Taskbar, right-click the tile and choose Pin to taskbar.
  • Show admin applications on the Start screen by clicking Settings in Charms, click Settings, and change the Show administrative tools from No to Yes.
  • In Internet Explorer 10, you can also pin any of your favorite web pages to your Start Screen.

Windows 8 keyboard shortcuts

Knowing at least some of the Windows 8 keyboard shortcuts helps make your Windows 8 experience much more enjoyable. Try to memorize these top Windows 8 shortcut keys.
  • Press the Windows key to open the Start screen or switch to the Desktop (if open).
  • Press the Windows key + D opens the Windows Desktop.
  • Press the Windows key + . to pin and unpin Windows apps on the side of the screen.
  • Press the Windows key + X to open the power user menu, which gives you access to many of the features most power users would want (e.g. Device Manager and Command Prompt).
  • Press the Windows key + C to open the Charms.
  • Press the Windows key + I to open the Settings, which is the same Settings found in Charms.
  • Press and hold the Windows key + Tab to show open apps.
  • Press the Windows key + Print screen to create a screen shot, which is automatically saved into your My Pictures folder.
See our Windows shortcuts page for a full listing of all Windows shortcuts.

Know your hot corners

The corners on your screen are hot corners and give you access to different Windows features. Below, is a brief explanation of each of these corners.
Bottom Left-hand corner
The bottom left-hand hot corner of the screen allows you to access the Start screen. If you're in the Start screen and have the Desktop open, this corner opens the Desktop from the Start screen.
Tip: Right-clicking in the left hand corner opens the power user menu.
Top-left corner of the screen
Moving the mouse to the top-left corner and then down displays all the apps running on the computer. Clicking and dragging any of these apps to the left or right-hand side of the screen will snap that app to that side of the screen. Each of these open app icons can also be right-clicked to close or snap.
Right-hand side of the screen
On the full right-hand side of the screen will be given access to the Windows Charms.

Taking advantage of search

The Search in Windows 8 has been significantly improved when compared to all previous versions of Windows. To search for a file or run a program in Windows 8 from the Start screen just start typing what you're trying to find or want to run.
As you begin typing, the results will start appearing on the left-hand side. The Search also supports limiting the search to apps such as Finance, People, Maps, Photos, Mail, Music, Videos, Weather, and much more. If what you are searching for is not a file or program, click on the app you want to use as the search. For example, if you were searching for "New York" and selected the Weather App you would be shown the weather in New York, NY.
By default, Search organizes the available Apps by how frequently they are used and then in alphabetical order. If you want to keep your favorite app at the top of the Search list, right-click the app and choose Pin. Pinning the app will lock it in place regardless of how often it is used. If there is an app you don't want (e.g. Finance) you can turn on and off any of the search apps through the PC settings, which is found under the Settings in the Charms.
Bonus tip: The Search is also found through Charms and can also be opened by pressing Windows key + F.

Running two apps side by side

Any app can be pinned to the left or right-hand side of the screen. For example, open the People app and then press the Windows Key + . (period) to move that app to the right-hand side of the screen, pressing the same keys again will move it to the left-hand side, and pressing the same keys again makes it full screen. While an app is pinned, any other app or program can be opened and loaded into the available space on the screen. For example, in the picture below, we've opened a browser window and have the People app running to monitor our social networks.
Windows 8 People
Any open app can also be pinned using your mouse by clicking at the top of the tile and dragging it to the left or right-hand side of the screen.
Bonus tip: The Desktop can also be pinned to the left or right-hand side of the screen.
Note: For snap to work properly your resolution must be at least 1,366 x 768.

Windows 8 Task Manager

The Windows 8 Task Manager has been significantly improved over previous versions of Windows. Some of the changes include a total percent usage of your Processes, improved Performance graphs, a Startup tab to see startup processes, and the App history tab (as shown below) for total resources an app. Press Ctrl + Shift + Esc to start exploring the new Task Manager.
Windows 8 Task Manager

Use a picture password to log into your computer

Windows 8 includes a new feature called Picture password, which allows you to authenticate with the computer using a series of gestures that include circles, straight lines, and taps. Enable this feature if you want a new way to access your computer or have a hard time with passwords.
  1. Open the Windows Charms.
  2. Click Settings and then More PC settings
  3. In the PC settings window click Users and then select Create a picture password
Bonus tip: A four digit pin password can also be created and used to access your computer.

Take advantage of Windows 8 apps

Windows 8 comes included with several apps to help you get the most from your computer. Below are just a few of the included apps.
People
Microsoft touts the People feature in Windows 8 because they understand how many people are using social networks today. In the People feature you'll be able to connect your Windows computer to all the major social networks including Facebook, LinkedIn, and Twitter. Once connected, you can pin the people app and monitor your social network (as shown below), use People in Search to find people, and get an overview of what is happening in all your social networks.
Windows 8 People
Reader
The Reader app gives you PDF support right out of the box.
SkyDrive
The SkyDrive app gives you access to the Microsoft cloud service for storing photos, documents, and other files in a cloud and access or share those files easier.
Store
Take advantage of the Windows Store and install one or more of the thousands of available apps designed for Windows 8. The Store is found in the Start screen, or use Search to search the Store app for any apps that you are trying to find.

Know the answers to common questions

Windows 8 is the biggest change to Microsoft Windows since the introduction of Windows 95, which was released all the way back in 1995. Since so many people have grown up with Windows, it can be difficult to transition to a new way of doing things. Below, is a short list of the most common questions previous Windows users have.

    Know the Jargon

    Knowing all the new jargon introduced with Windows 8 help improve your familiarity with Windows 8 and make it a more enjoyable experience. Below, are just a few links to the most commonly used Windows 8 terms.
    • Charms
    • Lock screen
    • Picture password


    Charms

    The Windows Charms was a feature introduced with Windows 8 that gave you access to Search, Share, Start, Devices, and Settings. This menu appears when you move you mouse on the top right-hand corner of the screen and then move down or by pressing the Windows key + C on the keyboard. The black bar along the right-hand side of the picture below is an example of what the Windows Charms looks like when open.
    Windows 8 Charms

    Description of each of the Windows 8 and 8.1 Charms

    • Search (shortcut: Windows key + F) - Find and open any program or file.
    • Share (shortcut: Windows key + H) - Share and send links, photos, and more to your friends and social networks in the app currently open.
    • Start (shortcut: Windows key) - Open the Windows 8 Start Menu.
    • Devices (shortcut: Windows key + K) - List available devices, for example a second screen.
    • Settings (shortcut: Windows key + I) - View Start Settings, view settings such as battery monitor, volume, brightness, notifications, and the power (to shutdown computer). In Settings you'll also find More PC Settings at the bottom of the menu, which gives you all available settings that can be adjusted.


    Lock screen

    Windows 8 Lock screenThe lock screen is a new feature introduced with Windows 8. It displays an image, the time and date, and can even show your preferred apps such as your calendar, messages, and mail, all while your computer is locked. The picture shows the Windows 8 lock screen.
    Tip: To lock the computer and show the lock screen press the Windows key + L.

    Changing the Windows 8 Lock screen

    1. Open the Charms by moving the mouse to the right-hand side of the screen or pressing the Windows key + C keys on the keyboard.
    2. In Charms click Settings.
    3. In the PC settings menu click More PC settings at the bottom.
    4. In Personalize under Lock screen select the picture you want to use for the Lock screen.
    Tip: At the bottom of the Lock screen section is Lock screen apps, which allows you to add and remove apps from the Lock screen.

    Getting out of the Lock screen

    There are several ways to unlock the lock screen. Press the spacebar, press enter, touch your finger and flip towards the top of the screen, or click your mouse and flick towards the top of the screen. 


    Picture password

    Picture password is a feature introduced with Windows 8 that allows you to create three different gestures on any image of your choice and use those gestures as your password. The gesture can be any combination of circles, straight lines, and taps. For example if the picture you chose was of a face your picture password could be a tap on each eye and then a circle around the mouth.
    Picture password

    How do I enable a Windows 8 picture password?

    1. Open the Windows Charms.
    2. Click Settings and then More PC settings
    3. In the PC settings window click Users and then select Create a picture password           

    Microsoft Windows shortcut keys


    Microsoft Windows shortcut keys

    Windows logoBelow is a listing of all the more commonly used Windows shortcut keys for every version of Microsoft Windows. If you are looking for shortcut keys related to programs in Windows, like Microsoft Word, Excel, Internet browsers, and others, see our "Other computer keyboard shortcuts" page linked below.
    General Windows keyboard shortcuts
    Windows function key shortcuts
    Windows key shortcuts
    How to navigate Windows using a keyboard
    Other computer keyboard shortcuts
    How do I create a Windows shortcut key?

    General Windows keyboard shortcuts

    Alt + Tab
    Switch between open applications in all versions of Windows. Reverse the direction by pressing Alt + Shift + Tab at the same time.
    Ctrl + Tab
    Switches between program groups, tabs, or document windows in applications that support this feature. Reverse the direction by pressing Ctrl + Shift + Tab at the same time.
    Alt + double-click
    Display the properties of the object you double-click on in Windows 95 and later. For example, doing this on a file would display its properties.
    Alt + Print Screen
    Create a screen shot only for the active program window in all versions of Windows. For example, if you opened the calculator and pressed these shortcut keys, only the calculator window would be created as a screen shot. If just the Print Screen key is pressed the whole screen will be made into a screen shot.
    Ctrl + Alt + Del
    Open the Windows option screen for locking computer, switching user, Task Manager, etc. in later versions of Windows. Pressing Ctrl+Alt+Del multiple times will reboot the computer.
    Ctrl + Shift + Esc
    Immediately bring up the Windows Task Manager in Windows 2000 and later.
    Ctrl + Esc
    Open the Windows Start menu in most versions of Windows. In Windows 8 this opens the Start screen and in Windows 3.x this would bring up the Task Manager.
    Alt + Esc
    Switch between open applications on Taskbar in Windows 95 and later.
    Alt + Spacebar
    Drops down the window control menu for the currently open Windows program in Windows 95 and later.
    Alt + Enter
    Opens properties window of selected icon or program in Windows 95 and later.
    Shift + Del
    Will delete any file or other object without throwing it into the Recycle Bin in Windows 95 and later.
    Hold down the Shift key
    When putting in an audio or data CD that uses Autoplay, holding down the Shift key will prevent that CD from playing.

    Windows function key shortcuts

    Below is a listing of keyboard shortcuts that use the keyboard function keys. See our what are F1 through F12 keys page for a full listing of what function keys do with all other programs.
    F1
    Activates help for current open application. If you're at the Windows Desktop, this will activate the help for Windows.
    F2
    Renames a highlighted icon, file, or folder in all versions of Windows.
    F3
    Starts find or search when at the Windows Desktop in all versions of Windows.
    F4
    In Windows 95 and later, this opens the drive selection or address bar when browsing files in Windows Explorer.
    • Pressing Alt + F4 closes the current open program window without a prompt in all versions of Windows.
    • Pressing Ctrl + F4 closes the open window within the current active window in Microsoft Windows. This only works in programs that support multiple windows or tabs in the same program window.
    F6
    While in Windows Explorer, this will move the cursor to different Windows Explorer pane or in Windows 7 browse available drives.
    F8
    Pressing F8 over and over as the computer is booting will start the computer in Safe Mode.
    F10
    Activates the File menu bar in all versions of Windows.
    • Simulates a right-click on selected item. This is useful if right-click is difficult or impossible using the mouse.

    Windows keyboard key shortcuts

    Below is a listing of Windows keys that can be used on computers running a Microsoft Windows 95 or later and using a keyboard with a Windows key. In the below list of shortcuts, the Windows key is represented by "WINKEY." Because not all these shortcuts will work in every version of Windows, we've mentioned which versions of Windows support each shortcut key combination.
    All versions of Windows
    Windows XP only
    Windows 7 and 8 only
    Windows 8 only
    All versions of Windows
    WINKEY
    Pressing the Windows key alone opens or hides the Windows Start menu. In Windows 8, this opens or hides the Start screen.
    WINKEY + F1
    Open the Microsoft Windows help and support center.
    WINKEY + Pause / Break key
    Open the System Properties window.
    WINKEY + D
    Opens the Desktop to the top of all other windows.
    WINKEY + E
    Open Microsoft Windows Explorer.
    WINKEY + F
    Display the Windows Search or Find feature.
    WINKEY + Ctrl + F
    Display the search for computers window.
    WINKEY + L
    Lock the computer and switch users if needed (Windows XP and above only).
    WINKEY + M
    Minimizes all windows.
    WINKEY + Shift + M
    Undo the minimize done by WINKEY + M and WINKEY + D.
    WINKEY + R
    Open the run window.
    WINKEY + U
    Open Utility Manager or the Ease of Access Center.
    Windows XP only
    WINKEY + Tab
    Cycle through open programs through the Taskbar.
    Windows 7 and 8 only
    WINKEY + 1-0
    Pressing the Windows key and any of the top row number keys from 1 to 0 opens the program corresponding to the number of icon on the Taskbar. For example, if the first icon on the Taskbar was Internet Explorer, pressing WINKEY + 1 would open that program or switch to it if already open.
    WINKEY + (Plus (+) or Minus (-))
    Open Windows Magnifier and zoom in with the plus symbol (+) and zoom out with the minus symbol (-).
    • Press the WINKEY + ESC to close the Magnifier
    WINKEY + Home
    Minimize all windows except the active window.
    WINKEY + P
    Change between the monitor and projection display types or how second screen displays computer screen.
    WINKEY + T
    Set the focus on the Taskbar icons
    WINKEY + Left arrow
    Shrinks the window to 1/2 screen on the left side for side by side viewing.
    WINKEY + Right arrow
    Shrinks the window to 1/2 screen on the right side for side by side viewing.
    WINKEY + Up arrow
    When in the side by side viewing mode, this shortcut takes the screen back to full size.
    WINKEY + Down arrow
    Minimizes the screen. Also, when in the side by side viewing mode, this shortcut takes the screen back to a minimized size.
    Windows 8 only
    WINKEY + ,
    Peek at the Windows Desktop.
    WINKEY + .
    Snap a Windows App to the sides of the screen. Pressing it multiple times will switch between the right and left-hand side of the screen or unsnap the app.
    WINKEY + Enter
    Open Windows Narrator
    WINKEY + C
    Open the Charms.
    WINKEY + G
    Cycle through Desktop gadgets.
    WINKEY + H
    Open Share in Charms.
    WINKEY + I
    Open the Settings in Charms.
    WINKEY + J
    Switch between snapped apps.
    WINKEY + K
    Open Devices in Charms.
    WINKEY + O
    Lock the screen orientation.
    WINKEY + X
    Open the power user menu, which gives you access to many of the features most power users would want to use such as Device Manager, Control Panel, Event Viewer, Command Prompt, and much more.